Adding OpenID to your web site in conjunction with ASP.NET Membership
 I recently added membership, accounts, login, etc. to the AspDotNetMVC site. While doing so I decided I wanted to support OpenID, too. However, I didn’t want to go with only OpenID because I needed ASP.NET Membership in place to work in conjunction with another application, a Kigg site used as a service for rating content on the AspDotNetMVC site. I could have probably converted the Kigg code base to use OpenID but I also wanted to allow people who may not have OpenID to create traditional accounts on the site without signing up for OpenID. Following are the steps I took to implement an OpenID login and integrate it with “traditional ASP.NET” membership. Follow these six steps and you can do the same.
1. Download the awesome C# OpenID library, DotNetOpenId from Google Code, and add it as a reference in your project. This is a great open source library developed by Andrew Arnott, Jason Alexander, Scott Watermasysk, Scott Hanselman, Joe Brinkman and others. It seriously does all the heavy lifting, comes with some good examples, and Andrew Arnott is doing a great job of making posts about fringe cases on his blog.
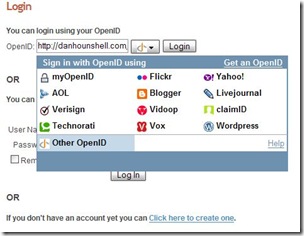
2. Add some nice usability features to your OpenID login. Go to ID Selector, create an account and grab the couple of lines of JavaScript to create the cool OpenID service selector shown in the image at right.
Did I mention that this is so easy that I don’t know why everyone isn’t supporting OpenID? Going forward I will be doing so in every new site that I create and I’ll retrofit existing sites when I get the chance.
3. Read the following articles:
- How to add OpenID to your ASP.NET web site (in C# or VB.NET) - Andrew Arnott
- Add OpenID login support to your ASP.NET MVC site - Andrew Arnott
- Enhancing the ASP.NET MVC OpenID login experience - Andrew Arnott
- How to add OpenID to your ASP.NET forms web site without using ASP.NET Controls - Andrew Arnott
- How to use DotNetOpenId’s Attribute Exchange extension - Andrew Arnott
- The Weekly Source Code #35 - OpenID Edition - Scott Hanselman
After reading the above you will have a pretty good understanding of how to add OpenID to your site. Some of the code examples in the earlier 3 posts by Andrew are a little out of date. As of the writing of this post the code provided in Hanselman’s blog post are the most up to date. Go ahead and read the two “MVC” posts by Andrew even if you are not interested in ASP.NET MVC. The concepts displayed in those posts can be used anywhere. In fact, it was in of those posts where I found my inspiration for overcoming my next hurdle.
The only thing that was missing for me was integration with ASP.NET membership. I actually found very little information for accomplishing this. I found quite a lot of questions asking how to do it, but most of the answers were just more questions asking why you would want to do it.
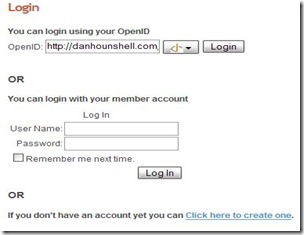
4. Create your login form (or user control or composite server control or whatever you prefer). In my case I created a user control that holds just the fields necessary for OpenID login and the logic behind them. Doing so allows me to drop that control into any existing login page (shown in image above) or my existing create account page or anywhere else I want to use it. Make sure you add the javascript for the ID Selector.
For allowing traditional ASP.NET membership login and user account creation I just dropped the basic out of the box controls on the page.
5. Wire up the login submit button. I did something like below, which is very similar to examples that Andrew and Scott Hanselman provided. Basically I’m just telling the OpenID provider that I need the user’s email and nickname (for use in the next step):
protected void loginButton_Click(object sender, EventArgs e) {
  if (!openidValidator.IsValid) return; // don't login if custom validation failed.
  OpenIdRelyingParty openid = new OpenIdRelyingParty();
  try {
    IAuthenticationRequest request = openid.CreateRequest(openid_identifier.Text);
    ClaimsRequest fetch = new ClaimsRequest();
    fetch.Nickname = DemandLevel.Require;
    fetch.Email = DemandLevel.Require;
    request.AddExtension(fetch);
    request.RedirectToProvider();
  } catch (OpenIdException ex) {
    // The user probably entered an Identifier that
    // was not a valid OpenID endpoint.
    openidValidator.Text = ex.Message;
    openidValidator.IsValid = false;
  }
}
6. Handle the response from the OpenID provider. This snippet of code is part of the login process and expands upon examples from Andrew Arnott’s and Scott Hanselman’s posts linked to previously.
Here I’m pulling the alias and email address that I requested in the previous step. With that information I check to see if the user already exists in the ASP.NET membership datastore. If not I will create a Membership account for them using their OpenID URI as their username. When I create the account you can see that I’m generating a random string for the user’s password field and password answer field. You’ll also see that I’m adding “This is an OpenID account. You should log in with your OpenID.” as the password question. That way if a user forgets they used OpenID and tries to login through the traditional username/password login form and selects that they forgot their password when the login doesn’t work, he or she will get a reminder about their OpenID in the form of the password question. I know it’s a hack, but it works for now for my modest needs and I’m happy with it.
Next you’ll see that after I create the Membership User I then set the user’s “comment” field to their Nickname. This is because the “Hello, Username. Welcome back to the site.” message at the top of the page would normally display the user’s “username”. In the case of OpenID users their username would be their OpenID URI - something like: http://danhounshell.openidprovidername.com/. That’s a bit ugly and I’d rather use the Nickname that I asked from then when they logged in with OpenID. By shoving the Nickname into the comments field I can first check to see if it has a value and if so use it in the display rather than their username. If it doesn’t have a value then I can default to the username. So now using my previous example it will say “Hello, DanHounshell. Welcome back to the site.” This same thing could be accomplished in a couple of other ways. Throwing the nickname into the session object or putting it in a cookie are other reasonable alternatives. In my case I don’t use the comments field for anything else so once again - I know it’s a hack, but it works for now for my modest needs and I’m happy with it. Plus it’s easy to get to by just writing “user.Comment”. Thinking about it, it might be nice to write an extension method for MembershipUser called DisplayName that determines whether to use the user.Comment property or the user.Username property.
Finally, I just call FormsAuthentication.RedirectFromLoginPage() passing in their OpenID URI that they provided, logging them into the site.
case AuthenticationStatus.Authenticated:
  ClaimsResponse fetch = openid.Response.GetExtension(typeof(ClaimsResponse)) as ClaimsResponse;
  string alias = fetch.Nickname;
  string email = fetch.Email;
  if (string.IsNullOrEmpty(alias))
    alias = openid.Response.ClaimedIdentifier;
  if (string.IsNullOrEmpty(email))
    email = openid.Response.ClaimedIdentifier;

  //Now see if the user already exists, if not create them
  if (Membership.GetUser(openid.Response.ClaimedIdentifier) == null)
  {
    MembershipCreateStatus membershipCreateStatus;
    MembershipUser user = Membership.CreateUser(openid.Response.ClaimedIdentifier,
      Common.GetRandomString(5,7),
      email,
      "This is an OpenID account. You should log in with your OpenID.",
      Common.GetRandomString(5,7),
      true,
      out membershipCreateStatus);
    if (membershipCreateStatus != MembershipCreateStatus.Success)
    {
      loginFailedLabel.Text += ": Unsuccessful creation of Account: " \+ membershipCreateStatus.ToString();
      loginFailedLabel.Visible = true;
      break;
    }
    user.Comment = alias;
    Membership.UpdateUser(user);
  }

  // Use FormsAuthentication to tell ASP.NET that the user is now logged in,
  // with the OpenID Claimed Identifier as their username.

  FormsAuthentication.RedirectFromLoginPage(openid.Response.ClaimedIdentifier, chkRememberMe.Checked);

  break;
That’s all there is to it. Now you can allow your user’s to choose whether they’d like to create an account on your site by creating a new username and password or by using their new or existing OpenID. The bonus with this method is that it allows you to add OpenID support to an existing site that already has traditional membership without breaking anything.
Enjoy and let me know if you have any questions or comments.
Update: October 09, 2008 - I posted a sample web application that uses the OpenID login control described in this post.